
In a time where more and more attention is being paid to new, emerging ways of building complex modern web-based applications, micro frontends are fast becoming a popular industry trend in the frontend developer community and increasingly widespread among many large organisations such as DAZN, SAP, IKEA, Starbucks and more.
As a relatively new approach, it is not always easy to find a place to start especially if you are unfamiliar with the concept of microservices. To facilitate adoption, I will be sharing my experience with micro frontends and how it can improve workflow efficiency and product quality, as well as a detailed beginner-friendly tutorial on how to develop a micro frontend application using Webpack Module Federation as an architectural solution.
Introduction
Micro frontend is an architectural design that helps you break your monolithic single page application into multiple smaller applications that appear as a cohesive and unified application to the user.
Take an ecommerce website for example, you can think of it as a single app that consists of many smaller apps such as Products app, Carts app, Authentication app and so on. Now depending the size of your company, you can break your team into smaller, different domains or teams to handle these sub applications individually.
Key Benefits of Micro Frontends
One of the driving factors for micro frontend adoption is the constant change of the JavaScript ecosystem which can be overwhelming. This has led to a much shorter lifespan of a JavaScript framework. On average, the lifespan of smaller JavaScript frameworks is about two years.
Other than these push factors, there are other problems that micro frontend architecture can solve:
- Maintainability of the code
A typical problem that a monolithic application suffers from is maintainability of the code. When your app exists for many years, it will eventually turn into a domino tower that nobody understands. Developers might also be too afraid to make changes to the code, hence the common approach to such a situation would be to apply features or fixes on top of existing layers which exacerbates the problem.
By implementing micro frontend architecture, you are able to decouple the source code which leads to easier administration. Each micro frontend sub app is able to work independently with a focus towards a specific domain or area of the app. They are also bounded in terms of context, which makes them independent from other micro frontend apps.
- Lifespan of a single programming language/framework
Regardless of how famous a particular programming language or framework is, things are moving and evolving quickly in our tech-driven world. By writing a monolithic app, you’re essentially putting all your eggs in one basket. When this framework or language is no longer active or maintained in the future, it will be a nightmare for your system as you would have to rewrite everything from scratch, in hopes that it can last a little longer this time.
Since micro frontends’ codes are decoupled in nature, it’s very easy for your team to write your sub app in different languages and frameworks, which in turn makes it simple to rewrite or migrate your application piece by piece.
- Agility
On a monolithic application, any change to the code will require compilation, testing and deployment of the entire application, which leads to overhead costs. In a micro frontend context, changes to a particular sub application will not impact other parts of the system. This makes testing and deploying easier, as you can choose to deploy sub applications anytime you want.
Note: This is only possible in run-time integration, not build-time integration. We will look at them in the next section.
Options to Build Micro Frontends
Although there are many ways or frameworks to implement micro frontends, they can essentially be distilled into five categories.
- Server-side template composition
- Build-time integration
- Run-time integration via iframes
- Run-time integration via JavaScript
- Run-time integration via Web Components
As some of them are small variants, I will only be covering build-time integration and run-time integration via JavaScript. If you wish to learn more about other options, feel free to visit these individual links.
Build-time Integration
As one of the approaches for micro frontend development, build-time integration simply means writing your sub application and publishing them as a NPM package, which the host application will then install and integrate. This might seem familiar to you as most JavaScript applications utilise NPM packages. You might have also just realised that you have been experiencing and reaping the benefits of micro frontend without actually being aware of it, by delegating functionalities to external parties such as react-router-dom to manage routing for your application and bootstrap to handle CSS for you.
Build-time integration works especially well when your project is maintained in a monorepo structure and utilises tools such as yarn workspace and lerna. It often benefits projects that try to give sub applications a certain degree of freedom, while trying to govern all sub applications at the same time to ensure that they are being developed in a certain fashion.
However, these benefits of the aforementioned governance comes with the lockstep release process problem that you might have to contend and compromise with. Imagine a member of sub application A spotting a bug and fixing it — this fix is not immediately available in production as the member has to wait for the host application to update the package and worst of all, wait to deploy the app as a whole. Due to this coupling and depending on the severity and impact of the bug, this may bring harm to your business.
A typical workflow of your apps implementing build-time integration is as follows:
- Individual team works on a specific sub application
- Proceed to publish the app to NPM packages when complete
- They will then notify the host application team to update particular packages
- Host application team updates the NPM packages version
- Host application team deploys the app according to their schedule
Run-time Integration
Contrarily, run-time integration via JavaScript works differently by having sub applications produce individual JS bundles. The biggest benefit that run-time integration provides over build-time integration is that it allows individual teams to upload or update their bundle anytime they want. The host application can then request these bundles during runtime from the agreed location, such as CDN.
A typical workflow of your apps implementing run-time integration is as follows:
- Individual team works on a specific sub application
- Proceed to produce JS bundles and upload to CDN or any storage when complete
And that’s it — there is no extra dependency or communication needed between the host and sub application during release.
In summary, most JavaScript applications use build-time integration, which only taps on the partial benefits that micro frontend offers. On the other hand, run-time integration resolves the lockstep release process problem and suits most organisational structures as it gives full control to individual sub applications. This was what we wanted to achieve with micro frontends in the first place. Without further ado, let’s explore how we can achieve this using Webpack Module Federation.
Webpack Module Federation
Webpack is a static module bundler that helps to compile JavaScript modules and create a dependency graph which consists of all the modules that your web app requires. These modules can come from either your projects or via third party NPM packages that sit in your node_modules folder, which Webpack subsequently turns into a single JS file. Developers have the option to improve caching performance by splitting this single JS file into multiple smaller chunks.
Released in conjunction with Webpack v5, which came with a bunch of improvements on its own, Module Federation provided the option of run-time integration for micro frontend applications. In layman’s terms, Webpack’s dependency graph can now not only map dependencies from local source files and node_modules, it can also map dependencies remotely and integrate those JS bundles during runtime.
Now that you have a better understanding of micro frontends and its implementations, and a brief introduction to Webpack and Webpack Module Federation, it’s time to get our hands dirty and develop a micro frontend application together. This tutorial will be as detailed as possible to cater to those who are new to the JavaScript ecosystem.
Note: For simplicity’s sake, I will be using monorepo for this tutorial. This will not have any impact on the application moving forward.
Before we begin, let’s imagine that we are going to build two micro frontend applications:
- subA: A React application that renders a simple DOM tree
- host: A React application that has its own DOM and integrates with subAss
Note: At the time of writing, create-react-app does not support Webpack Module Federation yet. Therefore, we are going to write everything from scratch.
Setting up a React Project for a Sub Application
First of all, let’s create an empty folder to house all our applications.
> mkdir -p mfe/subA
We are going to focus on developing subA, so change our working directory to subA.
> cd mfe/subA
As Webpack Module Federation was just released and currently undergoing active development, things may work differently in the future. Therefore, I’ll include package.json with a predefined version for packages.
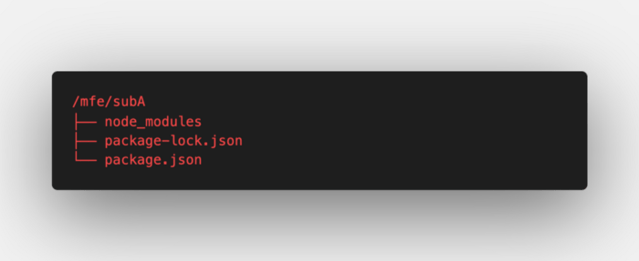
At this stage, subA folder should only have a single file package.json so we can now install the packages by running the following command.
> npm install
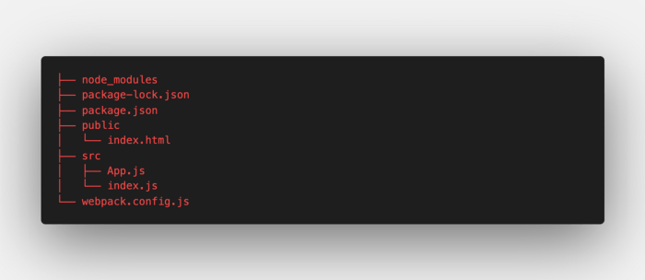
One the installation is complete, subA should have this structure:
Now that we have the packages installed, let’s start creating our configuration for webpack.
> touch webpack.config.js
Once this config file is ready, we can add the following content into the file:
There is nothing related to Webpack Module Federation so far — what we’ve mainly achieved are:
- Setting output so that HtmlWebpackplugin knows where to place the produced bundles
- Setting devServer so that we can utilise webpack-dev-server package which acts like a development server
- Setting module which hooks up a couple of babel presets. Babel is basically a tool that transpiles modern JavaScript syntax so that older browsers can understand modern JavaScript syntax. We have excluded /node_modules/ which is to improve performance because we can safely assume that the codes residing in /node_modules/ have been transpiled
- Setting HtmlWebpackPlugin so that we can let this plugin inject<script > tag into ./public/index.html. We need this for our site visitor because by default, Webpack only produces JavaScript bundles but it never gets imported into any html.ss
Now that we’ve configured webpack, we should then create the missing index.html that HtmlWebpackPlugin requires.
> mkdir public && touch public/index.html
Open up index.html and add a really simple html block in the file.
We are only creating the bare minimum html file with a div tag with id=”_sub-a-root”. By having this div tag, we can then start writing our React code and rendering the app into the above div. As with any React app, let’s create a src folder and two files — index.js and App.js.
> mkdir src && touch src/index.js && touch src/App.js
Inside our index.js, we have the minimum information for React to know where we want to render the dom.
As for App.js, we will export a very simple react App component:
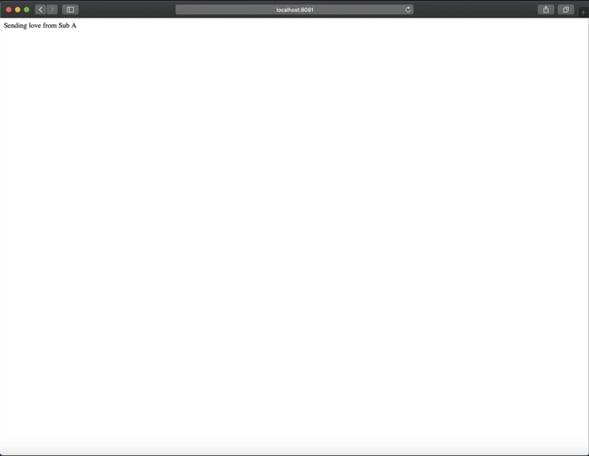
Now that we have the bare minimum for in order to kick start a React app, let’s try to validate if everything is working properly. We can define the scripts section with start script into our package.json.
After the start script is defined, you should be able to run the app using command npm run start. You can then visit http://localhost:8001 to view your site, as seen below:
Finally, we have our subA application running, so now let’s take a look at how we can set up our subA as a remote bundle.
Setting Up as a Remote Bundle Using Webpack Module Federation
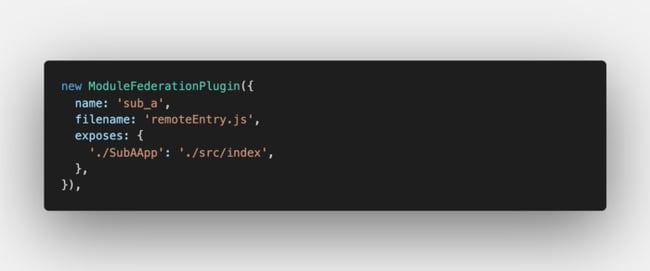
First, open up webpack.config.js and import ModuleFederationPlugin at the top of the file.
Once that’s done, you can define the plugins:
Let’s go through the options we’ve defined in ModuleFederationPlugin.
- name — this is to allow your host app to recognise your app
- filename — most of the time, we will define the name as remoteEntry.js which is a file produced by ModuleFederationPlugin so that host apps knows how to work with sub_a
- exposes — you can think of this as the file you want to expose to public/host and the name they should refer to. In this case, if any host application tries to request for SubAApp, it gives them src/index.js
You will need to kill the running instance by hitting Ctrl + C and run command npm run start to initialise the Webpack server again. Let’s visit http://localhost:8081 again.
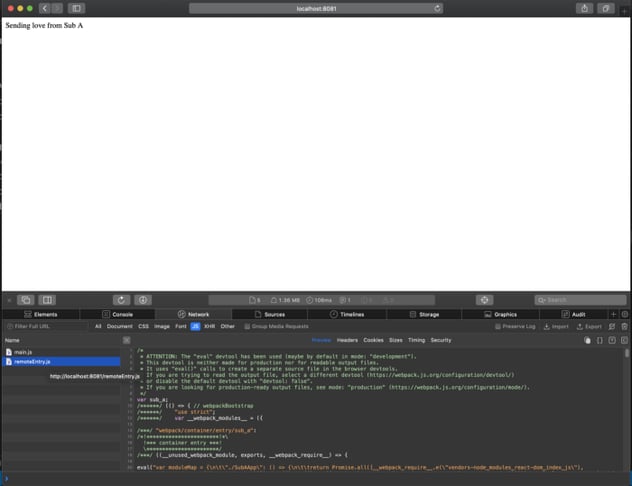
When you open up the developer console, take a look at the network tab. You will see two JavaScript files being requested — main.js and remoteEntry.js.
Exposing a Function or Component
Although it’s running fine locally, we have a couple of problems in subA/src/index.js we need to address:
- We are hardcoding #_sub-a-root which means that when we integrate with the host application, we will need to define #_sub-a-root in host/public/index.html. This is not ideal because we want to decouple as much as possible
- There is no way for us to pass any information between host and subA simply because subA/src/index.js is only about rendering, so it will be beneficial if we create a simple interface for the host to interact with
In order to fix this, we can define a function in index.js and export it for our host instead of directly rendering the app component to the DOM.
It’s a really simple idea — we are defining a mount function and invoking it manually rather than ReactDOM.render(…). By doing so, we can then export our mount function which allows the host application to invoke it. Finally, your subA folder should have this structure:
If you’ve been following along, give yourself a pat on the back. This is all the configuration we need to set up Module Federation for a remote bundle. This means all that’s left is to figure out how to make our host application consume or integrate with it.
Setting up a React Project for a Host Application
Firstly, create a working directory for our host application inside the mfe folder.
> mkdir hosts
Once that’s done, copy package.json from the subA folder and install dependencies.
> cd host && npm install
Similarly, we can copy our public and src folder from subA to host. Once that’s done, we can start making changes to public/index.html by changing the tag’s id to _host-root.
Don’t forget to update it in src/index.js too. Since we are not exposing any interface, we can use the simplest way to render the App. At this point of time, your host/src/index.js should look like this:
Before we continue updating our App.js, let’s take a pause here and work on our Webpack. We are going to create a file webpack.config.js and set up Babel and devServer.
Note: I will not go into detail on what these properties are, but feel free to refer back in the article if needed.
Apart from the change of port from 8081 to 8000, this is nearly identical to the configuration of our subA application. Once this step is done, we should be able to run our host application and verify that it’s working as expected through http://localhost:8000.
> npm run start
Even though you should be able to see the text “Sending love from Sub A”, we have not set up ModuleFederation for hosts yet. This is the result of copying App.js from subA.
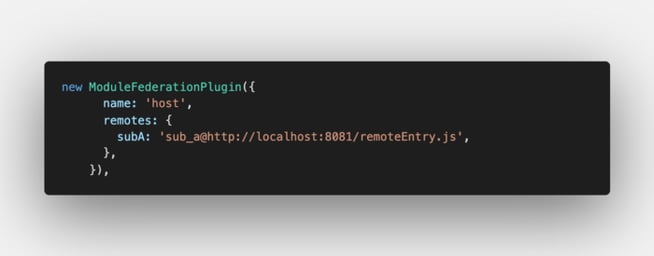
Now that we’ve verified the setup of the host application, it’s time to wire it up with ModuleFederation. Import the plugin and define where you want to fetch those remote bundles from.
Add the following code to the top of webpack.config.js.
You can then define the plugins.
Let’s go through the options we’ve defined in ModuleFederationPlugin
- name — this is optional for a host application since you’re not exposing yourself, however I’m adding it just to improve clarity
- remotes — this is where you define the name of the remote bundle and the location of the remoteEntry.js
This is all the configuration we need for webpack.config.js. If there is a required dependency of subA, webpack will be able to detect where the remote bundle is since we have already provided the location for the bundle.
Create a React Component That Acts as SubA
Firstly, create a component that represents the SubA application. You can place SubAApp.js at src folder:
Before we try to understand the first line of import, let’s take a look at the remainder of the code as it’s not related to Webpack Module Federation.
In a nutshell, what we’ve done here is try to create a React component that can represent SubA. Hence, we’ve defined a useEffect hook that simulates the componentDidMount component lifecycle.
When it’s first mounted, we invoke a mount function from the SubA application which can then be rendered as a new DOM tree.
As for the first statement:
> import { mount } from ‘subA/SuBAApp’;
Usually when we have an import statement, Webpack will look at it and try to understand subA/SubAApp. It will do so from a couple of locations such as local files or node_modules.
However, Webpack is not going to be able to find it because subA/SubAApp is neither defined locally nor a NPM package. Therefore, Webpack will then head over to host/webpack.config.js to determine if SubA is a bundle that can be requested remotely.
Sure enough, Webpack will be able to see that SubA is actually defined in webpack.config.js. We have also specified the location of where to find it remotely. You may be wondering about SubAApp: where is this defined?
Remember that when we defined our remote bundle, we also specified the key exposes.
When we wired up ModuleFederationPlugin at SubA, we have “exposed” SubAApp to any requests which Webpack will serve ./src/index.
Import SubAApp Component into App.js
Now that we have a React component that represents SubA, we can import it into App.js.
Note: We are using lazy and suspense from React as we want to dynamically import the component.
You can now head over to http://localhost:8000 to review the result yourself.
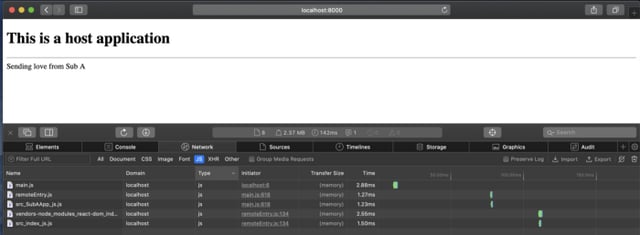
And voila! We have now successfully created a React component that represents a remote bundle and can be mounted anywhere in host as we see fit. In fact, it is nothing but an ordinary React component.
If you look at the Network tab of the developer console, you can see that there are a couple of JavaScript files being requested:
- main.js — serving from http://localhost:8000 . It is the main bundle that represents host application
- remoteEntry.js — serving from http://localhost:8081 . We have told host/webpack.config.js that if it’s needed, pull the file as remote bundle
- src_SubAApp_js — due to lazy loading from our host application when we were trying to import SubAApp component
- vendors-node_modules_react-dom_index_js.js — serving from http://localhost:8081 . This bundle has all the dependencies coming from our subA node_modules folder
- src_index_js.js — serving from http://localhost:8081 . This file was requested by remoteEntry.js because we’ve exposed and named alias with ./SubAApp’: ‘./src/index’
sNote: Complete code can be found at https://github.com/paloitsingapore/webpack-module-federation
Conclusion
In recent years, we’ve seen how well many organisations have adopted microservices as an architectural design to drive their products and services. By bringing in these benefits to frontend development via micro frontends, we are now able to push the boundaries of what’s capable in software delivery, from scalability to speed across autonomous teams.
That being said, there are many ways to implement micro frontend and Webpack Module Federation is my ideal choice as most web apps have been using webpack as a tool. Thus, it’s really easy to implement WebpackModuleFederation to achieve run-time integration.
Thank you for reading and I hope this guide serves as your trusty companion to help you to kick start your journey in micro frontends. For feedback and collaboration opportunities, I invite you to connect with me and let’s keep this conversation going!