
In the last 5 years, Go (or Golang, if you want a more specific search term 😂) has taken a big part of server development around the world. One of the main reasons for that is how FUN it is to write any programs, big or small, in Go. By taking away the unnecessary complexities in today’s modern framework and most of the legacy languages, Go could be designed so that it answers to the cloud architecture of the new era. The most likely use cases of Go are Command Line Interface (CLI), Web services, and distributed microservices. Due to a very fast startup time, Go is a good fit with Cloud-native, scalable architecture. If you are interested, there is an article about how the bright minds at Google have managed to come up with the idea and the problems that push them to the solution here. It was a fun read.
At PALO IT Thailand, Go is our current language of choice when we're going to start a new project, especially in microservices or serverless contexts. This post will provide a walkthrough of the process of creating a new project with serverless architecture. At the end of this blog you will have a working boilerplate of Go-Serverless to get you started!
The next piece of technology that we're going to cover in this blogpost is serverless. Usually, serverless architecture means you, as a developer, write functions that do one simple thing in a short-lived, stateless fashion. Then deploy them (preferably automated, like everything we do at PALO IT) on any cloud provider. After successful deployment, you will receive a URL pointing directly to your functions. When these URLs are called, a container will boot up (which maybe cold or warm boot), execute your function, return the result, then shut down.
The one obvious advantage is that you will be billed only for the execution time and amount of memory used. This cost model will save you a lot when you're just getting started, without many users.
For the serverless provider, we will test with a local AWS Docker container so you don't need to publish your code at all! But in theory, our architecture should work with any provider with the magic of the Serverless Framework.
Bringing in the Tools
Before we get started, I'm going to assume you already have NodeJS 14+ and Go 11+ installed and setup properly. But if you don't, please do. It usually does not take longer than 5 minutes.
I'll be waiting right here. ⌚️ ... You're back already? Good! Let's continue. 💪
Serverless Framework
"Serverless Framework" is a project that aims to help make setting up, configuring, and deploying serverless projects a lot easier. Essentially, the team has managed to standardize serverless configuration for multiple cloud providers (AWS, Azure, Google Cloud, etc.) into one, single format.
The Serverless Framework – Build applications comprised of microservices that run in response to events, auto-scale for you, and only charge you when they run. This lowers the total cost of maintaining your apps, enabling you to build more logic, faster. The Framework uses new event-driven computing services, like AWS Lambda, Google Cloud Functions, and more. It's a command-line tool, providing scaffolding, workflow automation and best practices for developing and deploying your serverless architecture. It's also completely extensible via plugins. -- Serverless Framework's Github page
Serverless CLI will help us scaffold our new project.
There are many ways to install Serverless Framework but since we already have NPM then the easiest way should be:
npm install -g serverless
Docker
Later in the post we will need Docker to have AWS λ (Lambda) containers running locally so it's better to have Docker ready.
Create a new project
We will let the Serverless Framework create a new project for us. For the boilerplate, we will go (pun intended 👀) with aws-go-mod template. So please run this command in your favorite terminal:
serverless create -t aws-go-mod -p myproject
The command we just ran will give us two services, hello and world services. Nothing too fancy here.
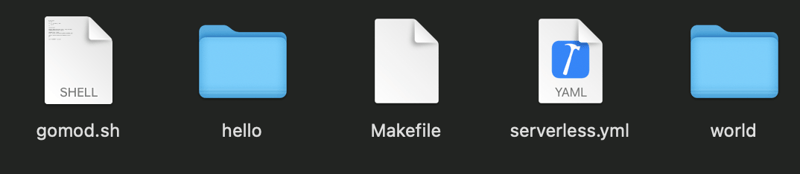
This is what you should have after the command
Next, we will give gomod.sh execution permission, execute it, and download Go dependencies with this command.
chmod +x gomod.sh && ./gomod.sh && go mod tidy
Developing
Because this is a Serverless project, just typing in "go run" command as usual won't do any good. You can publish this "hello world" project to some cloud provider to see it working flawlessly, but why would you want to do that?
When our software is being developed, it's often much faster to deploy-test-repeat locally. And we're going to do just that by installing a certain Serverless Framework plugin called Serverless Offline.
Install Serverless Offline Plugin
Make sure you are in our project directory:
npm init
Because the template did not properly initiate as NodeJs project yet. So we need npm init to create a package.json file for us. After that, please run:
npm install serverless-offline --save-dev
After the command finishes, open serverless.yml in your favorite code editor and add these lines.
plugins: - serverless-offline custom: serverless-offline: useDocker: true httpPort: 4000 dockerReadOnly: false # allow test to write coverage result While the "serverless-offline" plugin supports native (host machine) Node.js, Python, Ruby λ runtimes, but for Go it needs to use Docker container to run, at least for now.
In the meantime, let's have a closer look at the serverless.yml functions section.
functions: hello: handler: bin/hello events: - httpApi: path: /hello method: getworld: handler: bin/world events: - httpApi: path: /world method: get
This section tells the Serverless Framework to look at bin/hello and bin/world binaries for hello and world functions respectively.
But we don't have that yet. 🤯
In order to have those binaries, we need to compile our code into unix executables (for Docker images, which are linux-based).
But how can we do that, you say?
Good question! Here comes another advantage of Go, Cross-compiling!
Cross-compiling with Go
In short, cross-compiling is the method in which one architecture/OS creates executables for ANOTHER architecture/OS that is completely different from itself!
It's almost magical.
By setting certain environmental variables which Go toolkit uses, we can change target output to our desired OS/Architecture. For example, env GOOS=windows env GOARCH=arm go build -o hello.exe ./hello/main.go will create a hello.exe in the current directory for windows/arm combination.
-
GOOS=windows -- we need Microsoft Windows executable
-
GOARCH=arm -- we need executable for ARM architecture
You can have a look at go tool dist list to see the list of all available OS/Arch combinations.
For our next move we have two approaches.
-
If you have GNU Make, you can issue
make buildto run the script inMakefilethat Serverless has generated for us. Try it now. -
If you don't then you can issue these build commands manually (replace
envwithsetif you're on Windows machine)env GOOS=linux go build -ldflags="-s -w" -o bin/hello hello/main.goenv GOOS=linux go build -ldflags="-s -w" -o bin/world world/main.go
Regardless of the alternatives, you will end up with two executables "hello" and "world" in ./bin/
Ready?
Now we are ready to roll! 🥁 Give it a try! 🚀
serverless offline

Try open a web browser to http://localhost:4000/hello and http://localhost:4000/world then you should see a proper welcome message! Hooray! 🎉
Testability
At PALO IT, like any good software company that's worth their salt, we are highly focused on the testability of our product. One key metric in testing is Code Coverage. For the next step, we will add some code, call the API, and get the coverage report in return.
If you still have serverless offline running, stop it now with Ctrl+C. We are not going to use it in this section.
Create a new file at hello/main_test.go and put in this code.
package main_test import ( "context" "github.com/palo-blog/myproject/hello" "github.com/stretchr/testify/assert" "testing") func TestHandler(t *testing.T) { ctx := context.Background() response, err := main.Handler(ctx) assert.Nil(t, err) assert.Equal(t, "{\"message\":\"Go Serverless v1.0! Your function executedsuccessfully!\"}", response.Body)}
Don't forget to replace "github.com/palo-blog/myproject/hello" with your own package name.
The code you just copied will invoke the lambda handler directly and compare the response with the expected string. If they match, the test will be "green" or pass.
Now go ahead and run the test.
go test -covermode=count -test.coverprofile hello.cov ./hello
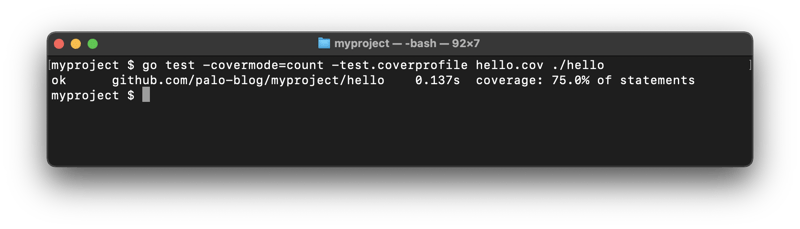
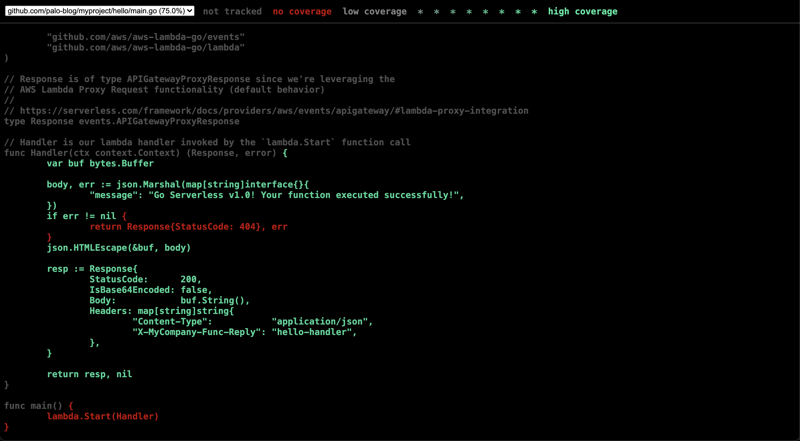
This means our test passed without any problems! ✌️ And our little test code has covered 75% of the module! You can view test coverage results in a nicely formatted HTML with this command.
go tool cover -html=hello.cov
And that has concluded our first Go Serverless project! Congratulations! 🥳
We Are Hiring
PALO IT, and our team in Thailand are always looking for new joiners. If you are interested in learning, coding, and applying cutting-edge technologies to make customers happy by writing good, testable software and also finding a way to make the world a better place, please let us know. We have offices across: Thailand, APAC, LATAM and France.
Or, get in touch with us directly 🙂 Thank you for reading.