

Not very long ago, I was working on a Spring Boot project, where we were automating an insurance claims submission process. The client had given certain non-functional requirements for retrying certain tasks and recovery scenarios. To visualise the whole story, I drew the business flow using BPMN notation on a piece of paper. And then it hit me…why don’t I use a process engine?
I have had used two process engines before: Activiti and Appway. As Activiti was open-sourced and built on Java, it was my natural choice. However, I faced a roadblock when I found out that the latest native Activiti was not compatible with Spring Boot 2.x.
Thankfully, I found out about Flowable! (www.flowable.org)
In this blog post, I will list out some of the problems I faced while getting started with Flowable and present some of the solutions I used to navigate these challenges.
Problem 1: How to Model the Business Flow Using Flowable
Flowable has its own web app that can be used to model the BPMN flow. You can download the war files from https://www.flowable.org/downloads.html. At the time of writing, Flowable 6.4.1 is the latest. Once you have downloaded and unzipped the folder, there will be a folder called “wars”.
Run “flowable-idm.war”, followed by “flowable-modeler.war” using the command “java -jar”. Once both the applications are running, simply browse to http://localhost:8888/flowable-modeler/#/processes in your browser. You can log in to the application using “admin” as the user name and “test” as the password.
Problem 2: How to Restrict Flowable from Creating Tables Every Time Our Application Boots Up
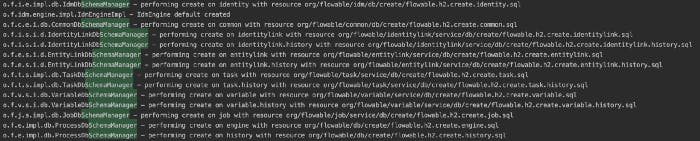
This was actually not very complex as the answer was in the flowable documents. Flowable uses a property called flowable.database-schema-update to determine what it needs to do with the tables during boot up. By default, its value is true. When this property is true, flowable will detect if the tables are already created and if so, will not run the SQL. So for our project, I just had to figure out what SQL scripts were running in Flowable. Once I knew that, I just had to create Liquibase scripts that can be managed by our application. The following image shows the path of the SQL scripts (highlighted in green) used by Flowable.
Problem 3: Autowiring Was Not Working In Service Tasks
After I finished modelling my flow in Flowable, it was time to wire the service tasks added in the model with the actual JavaDelegate classes of the application. I first tried giving the fully qualified class name in the Service Task class property.

The class TransferToSftpTask implemented Flowable JavaDelegate interface. The problem with this approach was that any class that I was auto wiring was not getting instantiated and hence, my business logic was failing. After some research, I found that rather than using the class property, I had to use the delegateExpression property and point it to the bean in Spring Application context that implemented the JaveDelegate.
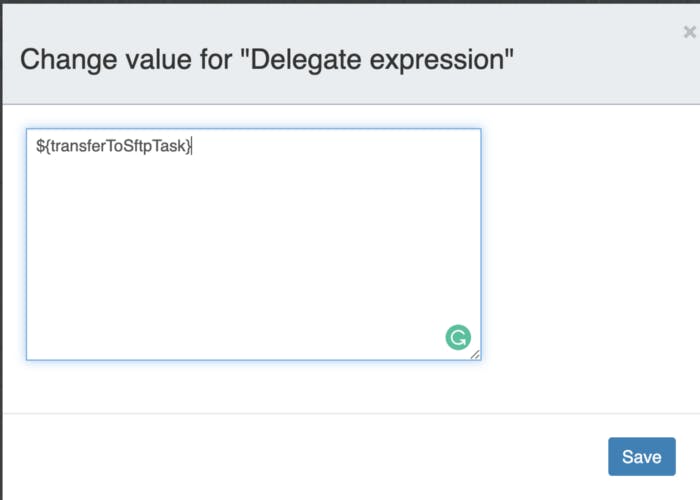
Since delegate expression points to the bean, we need to annotate the TransferToSftpTask as a Component so that Spring creates and injects the bean to the application context.
Problem 4: The Flowable Process Was Not Starting
As part of my business flow, I had to copy some files from an S3 bucket to an SFTP folder. I thought of using Spring Integration to achieve this. As soon as I brought in the Spring Integration dependancy, I discovered that my process was not triggering. It’s important to mention that all my service tasks were marked as asynchronous. When we have Flowable and spring-boot-integration-starter in our application, both will try to create 2 beans of TaskExecutor interface. Spring-integration creates a bean of ThreadPoolTaskScheduler, while Flowable tries to create a bean springAsyncTaskExecutor of type TaskExecutor if there are no beans of that type available. Spring boot WebMvc tries to auto-configure a ThreadPoolTaskExecutor, a type of TaskExecutor. When you don’t have the spring integration, Flowable uses this ThreadPoolTaskExecutor. When you have the spring integration, it gets confused as there are two beans of the same type and thus, tries to resolve the dependency by determining if one is primary or has a higher priority. Hence, when we try to start a process and it does not find any, it fails. Spring boot WebMvc injects this TaskExecutor through TaskExecutionAutoConfiguration. Thus, all we needed to do was exclude this TaskExecutionAutoConfiguration from our Spring Boot Auto Configuration.

Problem 5: Configuring Retry Mechanism
In its default configuration, Flowable reruns a job three times if there’s an exception in the job execution. On the other hand, our clients wanted the number of retries and the delay between two retries reconfigured. This can be achieved in Flowable by auto wiring ProcessEngineConfiguration.

And then by introducing the following two lines. The method setAsyncFailedJobWaitTime sets the delay in seconds, while setAsyncExecutorNumberOfRetries sets the number of retries.

The only thing that we should keep in mind here is that the above code will set the configuration as a whole. If we need more granular-level configuration such as for a specific task, we need a different retry or delay value that can be achieved by adding the following tag in the process XML under the service task tag.
<extensionElements>
<flowable:failedJobRetryTimeCycle>R5/PT7M</flowable:failedJobRetryTimeCycle>
</extensionElements>
Time cycle expression follows the ISO 8601 standard, just like timer event expressions. The example above makes the job executor retry the job 5 times and wait 7 minutes between before each retry. This expression cannot be added through modeller yet, so after the process is modelled and downloaded as XML, the above expression needs to be manually added.
Problem 6: Only Retry the Task That Failed
Our business flow was quite complex. It had two subprocesses running in parallel. Each sub-process has a series of tasks. To keep things simple, let us consider a business flow that has 3 services tasks in sequence. If there was an exception on the third task, Flowable would retry it again from the first task. Though this behaviour is okay for some business flows, this was a problem for the one we had. To resolve this problem, we had to mark each task as asynchronous in the modeller.

When a task is marked as asynchronous, Flowable marks them as separate jobs. Thus, when an asynchronous task is executed, Flowable will commit the transaction and the job-related progress will be visible by other components in the database. So now if an exception is thrown in the second task, while the transaction associated with the first task has been committed, the transaction associated with the second task would be rolled back. When the tasks are not marked asynchronous, the same transaction will be associated with all tasks. Thus, an exception in the second task will also rollback the changes done by the first task. After marking the tasks as asynchronous, the retry mechanism only triggered the task where the exception was thrown and not any before that.
Problem 7: Logging Error-Related Information In the Database
This is an extension of the earlier problem I shared. However, once you understand how Flowable manages the transaction, the solution becomes clear. When an exception is thrown in one of the service tasks, we wanted to log an error in our database. But since Flowable was rolling back the transaction, our database save was not persisted. The solution to this problem was simple. We called one more service to persist the data using a REQUIRES_NEW transaction type. This will create a new transaction and suspend the outer transaction. When this method is exited, the new transaction is committed. So now if we throw an exception at the task level, the outer transaction rolls back, while the error log gets persisted in the database.
Well, that’s it for my blog post! If you’re considering giving Flowable a try or are experiencing similar challenges, I hope this will give you a better understanding of how Flowable works.